

How to Set Up a Cold Plunge at Home
Table of Contents
- Choosing the Right Tub or Container for Your Cold Plunge
- Best Cold Plunge Chillers and Filtration Systems
- Temperature Control and Water Quality Monitoring
- Cold Plunge Safety Precautions and Electrical Setup
- Plumbing and Hose Connections
- Cold Plunge Duration for Beginners and Recovery Protocol
- DIY vs. Pre-Built Solutions and Long-Term Operating Costs
- Conclusion
Last Updated: August 21, 2026
Setting up a cold plunge at home transforms recovery from a luxury reserved for elite athletes into something you can access daily. This guide from Prime Recovery Den walks you through every step, from selecting the right tub to understanding electrical requirements and managing water chemistry, so you'll know exactly what's involved and whether a DIY or pre-built solution makes sense for your space and budget.
Choosing the Right Tub or Container for Your Cold Plunge
The tub is the foundation of your entire setup. Your choice determines water capacity, durability, insulation quality, and how the system integrates into your home.
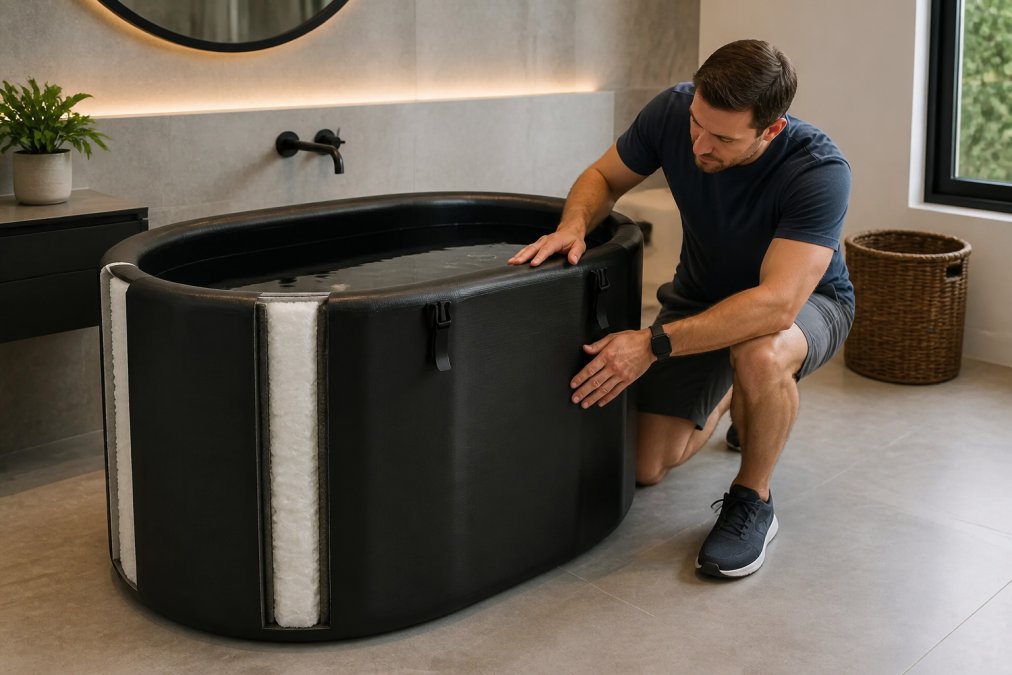
Three main tub types dominate the market: acrylic, fiberglass, and inflatable. Acrylic tubs like the RevX Acrylic X Tub Cold Plunge offer the deepest immersion (34+ inches) and premium aesthetics that fit a sophisticated home environment. They're built to last decades with proper maintenance, providing stability and safety during immersion. Fiberglass sits in the middle, durable and less expensive than acrylic, though not as refined visually.
Inflatable options like the Nicebeam Cryo Pro XXL offer flexibility and lower cost. They're chiller-ready and compact for storage, making them ideal if you're testing whether cold plunging fits your routine before committing to a permanent installation. The trade-off: inflatable walls provide less insulation than rigid materials, meaning your chiller works harder to maintain target temperatures.
Capacity matters significantly. A 200+ gallon tub allows full-body immersion without cramping. Smaller tubs (100-150 gallons) cost less to fill but force you into a seated position rather than true submersion. For serious cold therapy, 200+ gallons is the practical minimum.
Insulation is non-negotiable. Look for tubs with 2-3 inches of foam insulation around walls and floor. This reduces heat loss substantially, lowering your chiller's operating costs. A poorly insulated tub will drain your energy budget quickly.
Install on a level surface. An uneven tub stresses seams, creates water pooling, and risks structural failure. Measure and prepare your installation space before delivery.
Best Cold Plunge Chillers and Filtration Systems
The chiller is your second-largest investment and the most critical component for maintaining safe water temperature. A quality chiller cools water efficiently while filtration keeps it clean and safe for repeated immersion.
Chiller capacity is measured in horsepower. A 1.5 HP chiller handles most residential setups, cooling 200-gallon tubs from ambient temperature to 50°F in 4-6 hours (ashrae.org). The RevX Acrylic X Tub with LUX 1.5HP Chiller represents the integrated approach, with tub and chiller matched for optimal performance. Larger tubs or faster cooling times require 2.0+ HP units.
Filtration prevents biofilm accumulation and extends water life between changes. Submersible pumps with cartridge filters remove particles and circulate water continuously. Some systems add ozone generators or UV light sterilization for enhanced sanitation without heavy chlorine reliance. The Fire Cold Plunge All-In-One includes ozone disinfection, which neutralizes bacteria and organic matter while requiring less chemical intervention.
Match hose diameter to your pump specifications, standard 1.5-inch hoses work for most residential systems. Undersized hoses create backpressure that reduces circulation and forces your chiller to work harder.
All-in-one systems like the Fire Cold Plunge simplify installation by bundling chiller, filtration, and sanitation in one unit. The convenience comes at higher upfront cost but eliminates compatibility guesswork and reduces maintenance complexity.
Temperature Control and Water Quality Monitoring
Maintaining precise water temperature between 50-59°F requires a reliable thermostat, proper insulation, and realistic understanding of how your installation location affects performance and home durability.
Thermostat and Chiller Runtime
Most chillers include digital controls that let you set target temperature and maintain it automatically. Premium models offer smartphone app integration for remote monitoring. The thermostat cycles your chiller on and off to hold your target temperature based on tub insulation quality, ambient temperature, and whether your setup is indoors or outdoors.
Indoor vs. Outdoor Installation and Floor Load Capacity
A 200+ gallon cold plunge filled with water weighs roughly 1,700 pounds, equivalent to parking a small car on your floor. Before installation, verify your floor can handle this load.
For indoor bathroom or basement installations, check your home's structural plans or consult a contractor. Concrete basement floors typically handle 200+ gallons without issue. Wooden upper-floor bathrooms are riskier; if your floor flexes when you walk near the planned location, that's a warning sign. Reinforcing floor joists costs $500-$1,500 but prevents catastrophic water damage.
Outdoor installations on patios or decks require a level concrete pad or reinforced deck structure rated for the load.
Condensation Management and Humidity Control
Cold water creates condensation on tub surfaces and in surrounding air. In poorly ventilated spaces, this humidity accumulates on walls, mirrors, and wood trim, promoting mold growth and wood rot.
Mitigation requires three steps: (1) Run a bathroom exhaust fan continuously during and for 30 minutes after each plunge session. A 100+ CFM fan removes moisture effectively. (2) Apply waterproof sealant to any wood trim, baseboards, or subfloors within 3 feet of the tub. (3) Keep bathroom doors open between sessions to allow air exchange.
Outdoor installations avoid this problem entirely, which is why many experienced cold plunge users prefer garage or patio setups.
Water Quality Monitoring and Chemistry
Test pH weekly, targeting 7.0-7.4. Check sanitizer levels (chlorine, bromine, or ozone) based on your system's specifications, typically 2-4 ppm for chlorine. Cloudy water signals incomplete filtration or chemical imbalance. Clear water with proper pH indicates your system is working correctly.
Thermal Efficiency and Chiller Runtime
Acrylic tubs with 2-3 inches of foam insulation lose heat slowly, meaning your chiller cycles less frequently and consumes less electricity. Inflatable tubs with thin walls lose heat quickly, requiring the chiller to run 8-12 hours daily just to maintain 50°F.
Ambient temperature matters significantly. A cold plunge in an unheated garage naturally stays colder, potentially reducing chiller runtime by 20-30% compared to an indoor bathroom heated to 70°F.
When you choose a product like the RevX Acrylic X Tub with LUX 1.5HP Chiller, the premium insulation and matched chiller sizing mean your system runs efficiently regardless of season or location. You'll feel the difference immediately: stable, consistent water temperature without the chiller cycling loudly every few minutes. Over months of daily use, this efficiency translates to lower electricity bills and a quieter, more reliable experience that encourages consistent cold plunge practice. You'll feel confident and secure during every session, transforming cold plunging from an anxiety-inducing experiment into a reliable daily ritual that genuinely improves how you recover and feel.
Cold Plunge Safety Precautions and Electrical Setup
Cold water immersion triggers involuntary breathing responses and cardiovascular changes. Electrical hazards add another layer of risk. Proper safety precautions prevent accidents and ensure positive experiences that encourage consistent use.
Electrical Safety and GFCI Requirements
A GFCI (Ground Fault Circuit Interrupter) outlet is mandated by the National Electrical Code (NEC) for any electrical equipment within 6 feet of water (nfpa.org). This device detects current leakage as small as 5 milliamps and cuts power in milliseconds, fast enough to prevent electrocution.
Install a dedicated 20-amp GFCI circuit for your chiller. Do not run your chiller on a shared outlet with other appliances. A dedicated circuit ensures stable voltage and prevents the chiller from competing with other loads.
If your home's electrical panel is more than 50 feet from your installation location, hire a licensed electrician to run new wiring. Undersized wire causes voltage drop, reducing chiller performance and creating fire hazard.
Verify GFCI installation by pressing the test button on the outlet, power should cut immediately. If the test button doesn't cut power, the GFCI is faulty or miswired.
Cord and Connection Safety
Use a heavy-duty, outdoor-rated extension cord if your chiller cord doesn't reach the GFCI outlet. Outdoor-rated cords (marked with a "W" on the jacket) resist moisture and UV damage. Coil excess cord loosely rather than wrapping it tightly around the chiller.
Inspect your chiller cord monthly for cracks, exposed wires, or discoloration. Replace any damaged cord immediately.
Cold Water Immersion Physiology and Safety
Cold water immersion triggers cold shock response: involuntary gasping, increased heart rate, elevated blood pressure, and potential disorientation (peer-reviewed research). These responses peak within the first 30 seconds of immersion.
Never enter a cold plunge alone, especially when starting. A spotter ensures you can exit quickly and provides assistance if needed.
Vasoconstriction, the narrowing of blood vessels in response to cold, happens immediately upon immersion. People with cardiovascular conditions, hypertension, arrhythmia, or a history of heart attack should consult their physician before cold plunging.
Progressive acclimatization over weeks allows your body to adapt safely. Start with 1-3 minutes of immersion during your first week. By week four, many people comfortably tolerate 5-10 minutes.
Condensation Management and Water Damage Prevention
Run a bathroom exhaust fan continuously during and for 30 minutes after each plunge session. Keep electrical outlets, cords, and the chiller unit itself away from direct water spray and condensation. Position your chiller at least 3 feet from the tub and ensure the area around it stays dry.
Why Premium Systems Simplify Safety
When you invest in an integrated system like the Fire Cold Plunge All-In-One, all electrical components are factory-sealed and tested for water resistance. The chiller, pump, and controls are engineered as a single unit with proper grounding and insulation. You don't assemble separate components or worry about mismatched voltage or improper connections.
Similarly, the RevX Acrylic X Tub with LUX 1.5HP Chiller pairs a matched chiller with a tub designed for safe, stable operation. The insulation and structural integrity mean you're not fighting equipment failures or safety surprises. You feel confident and secure during every session, which transforms cold plunging into a reliable daily ritual that genuinely improves how you recover and feel.
Plumbing and Hose Connections
Proper plumbing connections prevent leaks, maintain water circulation, and simplify maintenance. Position the intake hose near the tub bottom where debris settles, ensuring your filter captures particles before they reach the chiller. Use stainless steel hose clamps, not plastic, to secure connections.
Outtake hoses return filtered, temperature-controlled water to the tub. Position the return line to promote water circulation and prevent dead zones where biofilm accumulates.
A submersible pump with a discharge hose simplifies draining when you empty the tub for maintenance or seasonal closure. Position the drainage outlet away from your home's foundation to prevent water pooling.
Test all connections under pressure before regular use. Run the chiller for 30 minutes, inspect every fitting and clamp for weeping or dripping, and tighten any loose connections.
Cold Plunge Duration for Beginners and Recovery Protocol
How long you stay in cold water determines the physiological response and recovery benefits. Start with 1-3 minutes of immersion during your first week. This brief exposure triggers cold adaptation without overwhelming your nervous system.
Week two, progress to 3-5 minutes if the first week felt manageable. By week four, many people comfortably tolerate 5-10 minutes. This gradual progression allows your body to adapt safely.
Recovery protocol matters as much as immersion duration. Exit the cold plunge slowly, wrap yourself in a robe or towel, and allow your core temperature to normalize gradually. Avoid jumping into a hot shower immediately. Instead, sit in a warm environment for 15-20 minutes while your body naturally rewarmed.
Cold exposure triggers a recovery response that peaks 2-4 hours post-immersion. This is when your body experiences reduced inflammation, improved mood, and enhanced parasympathetic activation.
DIY vs. Pre-Built Solutions and Long-Term Operating Costs
The DIY approach appeals to budget-conscious builders willing to invest time in assembly and troubleshooting. Pre-built solutions cost more upfront but eliminate compatibility questions and installation complexity.
A basic DIY setup might cost between $1,500-$2,500 in components. You source parts separately, assemble connections, and handle installation yourself. The advantage: flexibility to customize. The disadvantage: potential compatibility issues and higher risk of mistakes.
The Barton DIY Cold Tub bridges this gap, offering a chiller-ready tub with insulation and cover included, letting you add your own filtration and chiller components.
Pre-built integrated systems like the Fire Cold Plunge All-In-One offer everything engineered to work together. Installation is simpler, warranty coverage is comprehensive, and you avoid compatibility headaches. For most homeowners, the peace of mind justifies the premium.
Long-term operating costs favor insulated, efficient systems. A well-insulated tub with a properly sized chiller runs 4-6 hours daily in temperate climates. Poorly insulated DIY setups can double these costs by running 8-12 hours daily just to maintain temperature. Over a year, this difference amounts to significant additional electricity consumption.
Setting up a cold plunge at home is an intentional choice to prioritize recovery and create a sanctuary for restoration. Prime Recovery Den's curated collection, including the Nicebeam Cryo Pro XXL Inflatable Cold Plunge Tub and RevX Acrylic X Tub with LUX 1.5HP Chiller, eliminates guesswork and delivers systems engineered for years of reliable performance. When you invest in quality equipment, you're building a daily ritual that transforms how your body recovers and how you feel. Start with thoughtfully designed equipment, and you'll experience the quiet satisfaction of time well spent on genuine restoration.
Frequently Asked Questions
How many minutes should beginners spend in a cold plunge?
Begin with 1-3 minutes of cold exposure, gradually increasing duration as your body adapts over weeks. Most beginners feel more confident starting at 60 seconds and adding 30 seconds weekly. Never exceed 10-15 minutes, even as you progress. Your nervous system needs time to adjust to cold stress. Listen to your body, if you experience uncontrollable shivering or numbness, exit immediately. Consistent practice builds tolerance faster than aggressive duration increases.
Do I need a chiller for my home cold plunge setup?
A chiller is essential if you want to maintain consistent water temperatures below 60°F year-round. Without one, ambient temperature controls your water, making cold therapy unreliable in warmer months. Premium options like the RevX Acrylic X Tub with LUX 1.5HP Chiller maintain temperatures between 34-104°F, giving you precise control. Budget-friendly alternatives like the Barton DIY Cold Tub work with most chillers, letting you upgrade gradually. All-in-one systems like the Fire Cold Plunge include integrated chillers, eliminating separate component purchases.
What are the most common cold plunge mistakes to avoid?
The biggest mistake is jumping into water colder than your body can handle, start at 55-60°F, not 33°F. Second, neglecting water filtration and sanitization leads to biofilm buildup and infection risk. Third, ignoring GFCI electrical requirements creates serious shock hazards. Fourth, placing your tub on uneven ground causes structural stress and water leakage. Finally, skipping a warm-up routine before cold exposure increases injury risk. Proper setup, gradual acclimation, and consistent water maintenance prevent nearly all common problems.
How do I maintain water quality in a home cold plunge?
Use a submersible pump with intake and outtake hoses to circulate water continuously, preventing stagnation and biofilm growth. Install UV light sterilization or an ozone generator for chemical-free disinfection, both eliminate pathogens without harsh chlorine. Test water chemistry weekly using a quality monitoring kit, checking pH, chlorine or ozone levels, and alkalinity. Drain and refill your tub every 2-4 weeks depending on usage frequency. Insulation foam around your tub reduces condensation and algae growth, keeping water cleaner longer.


Leave a comment
This site is protected by hCaptcha and the hCaptcha Privacy Policy and Terms of Service apply.